|
|
 |
|
|
GWR Route: Alcester to Hatton Junction
GWR Route: North Warwickshire Line
Bearley Junction: gwrbj775
 |
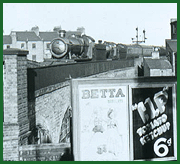
Photographed from the end of Bearley Platform in 1938, the
5.45am Leamington to Honeybourne local freight hauled by a pannier tank waits
adjacent to Bearley East Junction Signal Box for shunter Walter Morris. Notice
the two MINKs behind the iron mink have their brakes applied. The junction for
the north curve and Alcester can just be seen branching to the right in the
middle distance, while the station goods yard is to the right in the
foreground. Two long refuge sidings next to the road crushing plant run
parallel to the north curve and could accommodate thirty wagons. Bearley East
Junction Signal Box, opened in 1872, had its frame enlarged in 1907 to 31
levers with the opening of the North Warwickshire Railway; and then again with
the doubling of the line to Hatton in 1938 to 37 levers. The signal gantry has
two sets of signals for two routes which are operated by three signal boxes.
The left hand pair controls the line to Stratford upon Avon whilst the right
hand pair controls the single branch to Alcester. The two top arms are
controlled by Bearley East Junction Signal Box whilst the lower signals are
handled by: Bearley West Signal Box for the Stratford upon Avon branch (lower
left arm) and Bearley North Signal Box for the Alcester branch (lower right
arm).
Robert Ferris
 back back
|
|
|