|
|
 |
|
|
GWR Route: Alcester to Hatton Junction
GWR Route: North Warwickshire Line
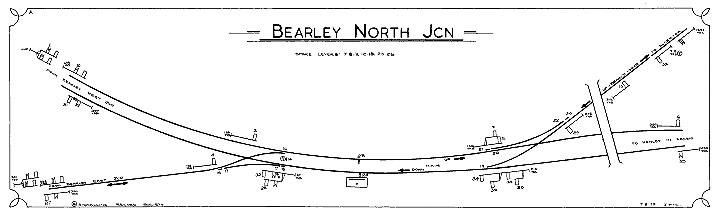
Bearley Junction: sig-diag-bearley-north
A low resolution version of the Signalling Diagram for
Bearley North Junction Signal Box produced courtesy of the SRS
A low resolution version of the Signalling Diagram for
Bearley North Junction Signal Box produced courtesy of the Signalling Record
Society (S.R.S.). Details of how to purchase their full resolution content is
available here. Bearley
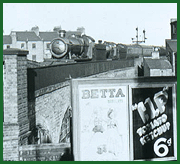
North Junction Signal Box opened on 24th November 1907. The Signal Box was a
standard Great Western Railway timber built design with a hipped roof and
stovepipe chimney (type 27C). The operating floor was 29 feet long and 12 feet
wide with the characteristic three up two down window panes. It housed
thirty-five levers in a horizontal tappet, three bar locking frame. Bearley
North Junction Signal Box weekday opening hours for a selection of years are
given:
| Service Time Table
|
Signal Box
Opened |
Signal Box
Closed |
| Summer 1916 |
7:30 a.m.
4:50
p.m. |
3:40 p.m.
7:20
p.m. |
| Summer 1929 |
7:00 a.m. |
9:00 p.m. |
| Winter 1930 |
6:00 a.m. |
10:00 p.m. |
| Summer 1939 |
6:30 a.m. |
10:30 p.m. |
| Winter 1945 |
6:00 a.m. |
10:00 p.m. |
The Signal Box here controlled the block sections on the
main double line and the token apparatus for the single track branch line to
Alcester and the north curve single line to Bearley Station. The Signalman sent
messages to the preceding Signal Box to give permission for trains to enter the
block section on their line and used signals to indicate to train drivers when
they were allowed to proceed. Distant Signals, distinguished by their forked
tails and yellow colour (post September 1927) gave train drivers advance
warning of the status of the next ‘Stop’ Signal. The two single lines
were operated using two sets of token apparatus. Only one token could be
released from each set at any one time and this was given to the locomotive
driver when he entered a single line section and surrendered when he left. This
way no more than one train or engine could occupy each of the single lines.
The Signal Box also controlled train movements associated
with the two single lines. The Signalman could set a route with the point
switch levers. These were interlocked with various types of signals (including
ground signals and route indicators), operation of which informed the
locomotive driver of the selected route and when to proceed. This interlocking
with signals ensured that these indicated to other trains, when they could no
longer proceed safely and had to stop. Visibility was important in the days
before track circuits and the Signal Box was positioned where it could oversee
the most complex trackwork.
 back back
|
|
|